3.1 Main window


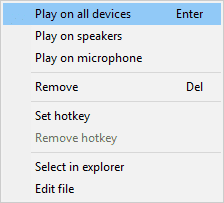
Play
Plays the currently selected sound file on speakers and microphone.
Play on speakers
Plays the currently selected sound file on speakers only.
Play on microphone
Plays the currently selected sound file on microphone only.
Pause/resume playback
Pause or resume the currently played sound file.
You may also change the play mode by pausing and then clicking on , or .To be able to change the play mode, you have to enable it in the preferences at File ▶ Preferences ▶ Interface ▶ Allow resume in another play mode.
Stop
Stops playback. You can also define a special hotkey for this function.
Play previous file
Play previous sound file in the list. Starts to play the previous sound file even if no sound file is currently playing.
The play mode of the last played file is maintained. It means, if your last file was played on speakers only, then the previous file will be played on speakers only as well.
Play next file
Play next sound file in the list. Starts to play the next sound file even if no sound file is currently playing.
The play mode of the last played file is maintained. It means, if your last file was played on speakers only, then the next file will be played on speakers only as well.
Track timer
Shows how far the current sound file has been played back in seconds.
Double-click the timer to select the currently played sound file in its category (or the previously played one if none is being played at the moment).
Seek slider
Shows the playback position of the currently played sound file and allows you to jump to another position in the track.
The seek slider indicates if sounds are played to others.
It is filled
- Red: The sound is played on the microphone and others can hear it as well.
- Blue (or the configured icon color): The sound is played on the speakers only.
Right-click the slider ▶ Select file to select the currently played sound file in its category (or the previously played one if none is being played at the moment).
Volume icon
Shows if the sound output on your speakers is muted.
You can click that icon to mute or unmute the output on the speakers.
Volume slider
Shows the output volume of Soundpad and allows you to adjust it.
The volume slider only affects the volume of your speakers, but not the volume of the microphone. To configure the microphone volume go to File ▶ Preferences and choose the Audio tab.
The volume slider is connected to the Windows Audio Session Volume Control, which can be accessed by right-clicking the sound icon in the taskbar ▶ Open Volume Mixer. If you change the volume in the volume mixer, Soundpad will show the change immediately and vice versa.
Microphone volume
This panel shows the current peak volume of your microphone. As soon as you speak or play sounds on the microphone, it will start to move.
It can be toggled at File ▶ Preferences ▶ Interface ▶ Toolbar ▶ Display microphone level on toolbar.
You can click the microphone icon to start the measurement of your voice volume. Sounds will be played as loud as your voice after you finish the measurement.
Categories
Toggle categories
Window ▶ Categories ▶ Close categories / Open categories.
Add category
Right-click a category or the category area ▶ Add.
Set random hotkey
You can define a hotkey to play a random sound from a category. Double-click a category
or right-click a category ▶ Edit. Expand More options at the bottom
of the upcoming dialog and click on Set hotkey.
Change icon size
Window ▶ Categories ▶ Smaller / Small / Medium / Large.
Move sounds
Move sounds by drag and drop or with
Move categories
Change the order of categories by drag and drop. You can also move categories into other
categories.
Category info panel
Displays additional information about the selected category. It can be toggled at Window ▶ Categories ▶ Show info.
Double-click the info panel or click on to edit the selected category.Hotbar
Toggle hotbar
Window ▶ Hotbar ▶ Open hotbar / Close hotbar.
Add a sound
Drag and drop a sound file from the sound list or from the file explorer onto the hotbar.
Play a sound
Left-click the hotbar entry, or assign a hotkey by right-clicking an entry ▶ Set hotkey.
Change grid size
Window ▶ Hotbar ▶ Set hotbar format.
Change color
Right-click an entry ▶ Color.
Move entries
Drag and drop hotbar entries to change their position. Press
Hotbar pages
Hotbar pages share the same hotkeys. It means
Sound list header
Sort sounds
Left-click on a column to sort the sounds by that column.
Click again to sort the sounds in opposite order.
Change column width
Drag the separator between two columns.
Move column position
Drag and drop columns from one position to another.
Hide or show columns
Right-click a column to choose which columns to show.

Sound entry
Select a sound entry by left-clicking or right-clicking it. You can also select multiple sounds to move them to another position in the list, or to move them into another category, or to remove them.
On right-clicking a sound you will see a context menu showing you, what you can do with
the selected sound(s):
Sound list
You can drag and drop sound files or directories containing sound files from your Windows' explorer onto the sound list to add them.
There are also default list functions, e.g. select, remove, copy, cut, paste, move, undo or redo. Most of these functions can be found in the Edit menu.
Status bar
The status bar shows additional information about operation outcomes, e.g. how many sound files were imported when importing a directory, or that a long-running task, like exporting all sound files to a directory, completed.
Certain warnings are also shown there, e.g. if you try to play a sound by hotkey and the sound doesn't exist on your hard drive anymore.
Play mode
The play mode determines whether a sound is played back on speakers, microphone, or both
when you play it by hotkey, double-click,
Hotkeys
Double-click it to disable or enable hotkeys. Right-click it to show a context menu with further options.
Auto Keys
This feature automatically presses keys for you when you play sounds. After setting it up, you can let Soundpad press the Push-to-Talk keys of your voice applications. It can be enabled or disabled by double-clicking its icon.
Repeat playback of current file
Enable this option to have Soundpad repeat the last played sound file continuously until you pause or stop.
Can be enabled or disabled by sole left-click or from the menu at Play ▶ Repeat playback of current file.
Continue playback after current file
Enable this option to have Soundpad play one file after another like a regular media player. Can be enabled or disabled by sole left-click or from the menu at Play ▶ Continue playback after current file.
Notifications
This is the notification area. When there is a notification, e.g. a new version of Soundpad is available, or there's a hint because you used certain options for the first time, then you'll see further information here.
Right-click the notification icon to display already confirmed notifications again.